Sunday 30 December 2012

Christmas Decorations

Christmas is over and we have the new year to look forward to so just to finish off December's Christmas themes, here are a couple of things I made for my Mum for Christmas. Both were inspired by trips to the Craft Barn demo days and both used Tando Creative products.


For this winter scene I used acrylic paint for the layers and some sparkle Mod Podge on the mountains. The windows and doors are drawn with a black micron pen and the title stamped and covered with glossy accents. The background is Tim Holtz tissue paper.

These Tando Creative stockings were fun to make, a made a few for friends and relations and kept one for myself. This one is painted with PaperArtsy Fresco Finish chalk acrylic paint in rose. This paint is opaque and so easy to work with, I think I might need to build up a collection of these paints, they are so versatile and the colours are fab. 
The swirl stamped image is from Personal Impressions and stamped using colorbox ink and embossed with fine clear embossing powder. The stocking is then triple embossed and some Perfect Pearls powder added with a small paintbrush before embossing to make an irridescent shimmer on the stocking. The same technique is used for the top of the stocking which I painted in black adding blue mica powder.

I hope you all had a happy Christmas and wish you all the best for the New Year.  
Julia x


Sunday 9 December 2012

A Voyage of Discovery

Christmas cards completed and ready to write and post so it was a nice change yesterday to make a birthday card for my Uncle.


The stamp is by Crafty Individuals CI-295 Discovery.
I used pastel chalks to colour tint the background in aqua and light brown and stamped the image twice so I could cut out the ship, colour it with distress markers (broken china and old paper) and decoupage it to add some dimension. I mounted it on kraft cardstock and punched holes on the side and cut into the card to make it look like a page torn from a book. The birthday wishes sentiment is from Craftwork cards, colour tinted with chalk to match the background.
I hope he likes it.

Hope you are all having a great weekend and not getting too stressed out about the Christmas preparations!

Friday 30 November 2012

Christmas Sparkles

A couple of last minute Christmas cards finished last weekend that I have been meaning to post all week.
I will call this one "SnowFlake Magic";


White card embossed with dots for the background.
The sentiment is from an IndigoBlu Christmas set stamped in Midnight Colorbox Cats Eye pigment ink and mounted on blue velum. Add navy blue velvet ribbon and a wooden snowflake inked in the same colour with a gem in the centre for sparkle.
The sentiment reads "When the moon shines on the snow at the eve of night and everything is silent, listen to the sound of pure magic." 

My second card is not an original idea as it was inspired by an example I saw at The Craft Barn recently. For this card I used a Dreamweaver penguin stencil and Imagination Crafts Sparkle Medium in Antique Bronze. This is mounted on copper mirri card for the border.


The challenge at Less is More this week is Week 95 Recipe : Glamour and Glitz so I think I will enter my penguins for that challenge, its glitzy with the sparkle medium and I think the penguins look quite glamourous in their sparkly outfits.


Saturday 24 November 2012

12 Tags of 2012 : November

Its the last Saturday of November and I have managed to find some time to have a go at the techniques used on Tim's November tag. This one was great fun and I bought the autumn gatherings die last time I went to The Craft Barn so it was a good excuse to try it out. Thanks to my clever friend Sally for suggesting that it can be used in the Cuttlebug without those extender plates, it works, money saved.

Go look at Tim's blog for the step by step guide and all the inspirational examples posted there.
I love the faux batik effect and fortunately I have an encaustic art iron so didn't have to ruin my regular iron in the pursuit of art!
Here is my autumnal November tag.


This is a great technique so I made a Christmas tag whilst the crafty bits were out, I might make more tomorrow. I hope you are all having a great weekend and staying dry if you are in the very wet UK. 
Happy Saturday X

Monday 19 November 2012

Two Colour Twinchies

This fortnightly challenge is Challenge #10 : Use two colours on the twinchies.

Yesterday I popped in to Hobbycraft and found one of their £1 clear rubber stamps that I thought would work really well on a twinchie. I like the Scandinavian Christmas designs and this one reminds me of knitwear, you know, those jumpers that people wore at Christmas in the 70's and surprise surprise, they are back in the shops again now. 


I made a set of three using pearlescent crimson Brilliance dewdrop ink to stamp the image on white cardstock and the same around the borders of the squares. The baubles are cut using a Sizzix die, masked and stamped using the same stamp and mounted with mini foam pads. I added pearls as accents on the baubles to finish them off.
I hope you like them. 

Saturday 17 November 2012

Thanks

CASology Week #19 : Thanks

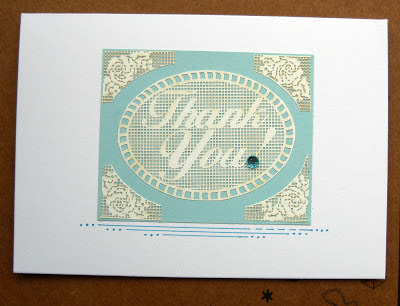
The cue card for the CASology challenge this week is Thanks so having missed the deadline for last week's challenge I was determined to make sure I photographed my entry in time to post it here. It seems an apt theme given that this week I received a lovely box of chocs from a friend as a Thank You for giving her a lift to the station earlier in the week, she didn't need to do that but I do love chocolate. I've not opened them yet, planning to share them at work!


The recipe for my card:
Paper Flair Laser Words "Thank You", I cut the roses off the image and used them as corner embellishments as I wanted to customise it a bit.
Blue paper background.
Mounted on white A6 card stock.
Doodled lines and dots to finish it off in blue and added a turquoise gem accent to the exclamation mark.

I hope you are all having a good weekend and get some time to do a bit of crafting.


Sunday 11 November 2012

Less is More : Houses

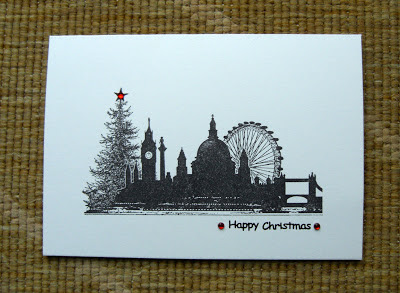
This weeks' challenge at Less is More is a one layer card with the theme being Houses. Here is my Christmas card showing the London skyline including the Houses of Parliament. The stamp is from Crafty Individuals and I have stamped it in black archival ink directly onto the white card added the black Happy Christmas sentiment and red gems to brighten it up.
This is an easy card to make and I love that London image, should be OK to send through the post as well so maybe I'll send this one overseas.


Lucky Black Cat

I was thinking to make a card with a black cat on it for a friend's birthday as she loves cats so I tried making my cat with a Dreamweaver stencil and some sparkle paste, what a mess, its in the bin.
I tried again, this time just using the stencil and colouring the cat in black, much better and very very easy. 
The cue card for CASology Week #18 is orange so I have coloured the cats eyes with an orange promarker pen and used the same to colour some white ribbon. I cut two slits with a craft knife to thread the ribbon through and tie the bow around his neck then mounted it on orange cardstock for the border.
I missed the deadline for the challenge but never mind.
Here he is:


Saturday 10 November 2012

Poppy Day

Remembrance Day 11th November 2012

"They shall grow not old, as we that are left grow old:
Age shall not weary them, nor the years condemn.
At the going down of the sun and in the morning
We will remember them."


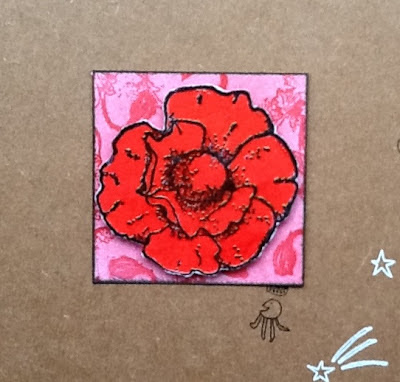
I made my twinchie for remembrance day and will enter it in the Show us Your Twinchies Challenge #9 'Hot Colours'.
I used red pan pastel for the background and stamped poppy buds in versmark around the edges, more pan pastel on top to highlight the buds. The main poppy image is a stamped and embossed in balck using an old freebie stamp from a magazine, coloured with promarker and mounted on the background. I used black soot distress ink around the edges.

Here is my remembrance poppy:


Friday 9 November 2012

Pink Snowflake

I am rushing about, busy, busy all the time but just wanted to post this quick card for the Less is More : Week 92 Colour Challenge which is PINK.
I picked up the December copy of Crafter Stamper magazine last weekend and the free stamp is a lovely holly snowflake. I wanted to try it out so why not stamp it in pink. I used ColorBox pigment cats eye in old rose for the image and the lettering for the sentiment. All mounted on pink and white cardstock and a pink Candi for the "O" in Noel. 
Now I need to rush off and cook dinner.
Here is my last minute entry for this week's challenge:

Sunday 28 October 2012

Snowflakes, Embossing and a Tiny Bit of Bling

"Less is More": Week 91 Sketch 7

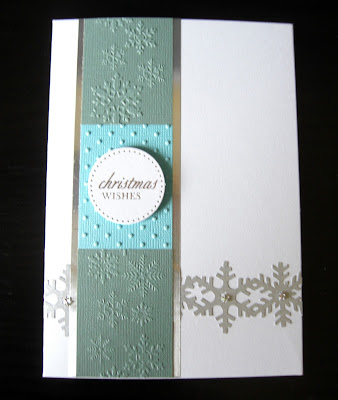
The challenge this week is to use a sketch and I particularly like this one as well as all of Chrissie's examples. The example with the dry embossed panels was one I really wanted to try and I am also starting to worry that I've not progressed with my Christmas card making so I decided to make a card with a snowflake theme.


I don't have many embossing folders but I have a border snowflake one which was a freebie with a magazine plus the Cuttlebug polka dots which is one of my favourites. I embossed using coordinations and bazzill cardstock and cut the panels to size, then mounted them on silver. The snowflake "ribbon" was made with a Martha Stewart punch and tiny star shaped gems added to the centres. I finished it off with a die cut sentiment from Craftwork Cards. This was simple and I like the layout.

Here is my entry for the challenge:


Saturday 20 October 2012

Spooky Stuff

Show us your Twinchies Challenge #8 : Spooky Stuff.

Here is my set of three twinchies with the spooky theme. Several attempts hit the bin this time but I have managed to produce three so here they are:


All images are from my IndigoBlu Hocus Pocus set of rubber stamps except the small spiders webs which are from Chocolate Baroque's Witches Brew set. The background for the gothic window twinchie is coloured with Promarker pens and I used the blender pen to remove some colour to make it look like a flame behind the image in the window, I think it works.
The background for the raven sitting on the books was originally cosmic shimmer chalk mist but it looked too pale so I added some Ripe Persimmon distress ink to brighten it up a bit and black soot around the edges.
The spiders web background is purple pan pastel, overstamped with webs in versamark ink and the same purple pan pastel on top. The spider is added in black and for the body I used black diamond stickles.

These were great fun to do, hope you like them. x

Night

I have been off work for a few days with the cold bug that has been going around and haven't felt a lot like doing anything at all. Yesterday afternoon, feeling a bit more perky I had a go at a Christmas card using my new Papermania Michael Powell stamp as a bit of colouring in on a Friday is always good for you. Yes, I'm feeling a lot better.

The cue card for week #15 at CASology is Night so I will enter my card in their challenge. I love the examples from the Design Team this week and the variety of entries from all the other artists, great stuff.


The image is stamped with black archival ink on white cardstock, coloured with Tim Holtz distress markers and mounted on a square Kraft card. I added glitter accents to the edges of the roofs, doesn't show in the photograph which is a bit disappointing, maybe a bit too subtle. I finally added coloured mini pearls (Doodlebug design inc. Christmas Assortment) for the lights. 
I hope you like this one.

Monday 15 October 2012

Wings

Here is my entry for the "Less is More": Week 89 Challenge where the theme is WINGS and it has to be a one layer card. I kept it very simple and was not tempted to add any sentiment.


The stamp is from Hero Arts, an old one in my collection, stamped directly onto a square white card with black archival ink. The dragonfly and elements are painted with Artquest Pearl Express watercolours. I haven't used these for a while but it was good to get them out again, I love the iridescence of the colours when it dries. This doesn't show up that well in the photo so I have added a close up. It still doesn't show up that well, oh well, never mind.  One small gem added to the card and it is finished.


I hope you like it. x

Sunday 14 October 2012

12 Tags of 2012 : October

Tim's theme for the October tag is Halloween and as usual I have had to improvise as I don't have any of the ingredients for this one. Since the fun of this is trying new techniques anyway, I thought I'd stick with the Halloween theme as it is not something I would usually do.
I don't have tissue wrap so I stuck an old book page on the tag and covered it with plain white tissue, used stormy sky and spiced marmalade distress stains for the background and black soot distress ink with a few swipes of purple. Then spritzed it with sheer shimmer spritz. The result is not as translucent as Tim's example but it works.

I have an IndigoBlu spiders web stamp so used that on the background. I made my own ticket from a bit of manilla card and cut the corners off, drew a black line around the border and stamped Spooky on it. I would like to get hold of that calendar stamp that Tim used though, very useful.

My focal point is an owl from Tando Creative which I covered in black diamond stickles as I have no rock candy. I really like the idea of adding alcohol ink to the rock candy, another item for my wish list. The bat is made from my Tim Holtz mini set of blueprints. I stamped it on white card, coloured it black and added glossy accents to make it shine. Added ribbon and it is done.
Phew ..... I like the background technique but I think if I were doing it again I would probably stamp some script direct onto the tag and then add the tissue paper.

Here is my October tag.


Saturday 13 October 2012

Gilding Flakes

CASology Week #14 : LEAF

The theme for the challenge this week is LEAF so this gave me the opportunity to try out a technique I saw on TV this morning using gilding flakes and double sided adhesive. The leaf is stamped directly onto the sticky adhesive in black archival ink, cover with a piece of acetate, remove the backing of the adhesive and apply the gliding flakes with a pair of tweezers. The trick is to then put it onto another piece of double sided adhesive and cut out the image, peel off the backing paper and it is ready to mount on the card.

I stamped the same leaf image using colorbox fluid chalks directly onto the white card and then added the gilded leaf. The sentiment is a copper peel off sticker and to match the black outline of the leaf I added a thin black line with a black micron pen.


I'm quite pleased with the result, I may try this again.

Ingredients:
White Cardstock
Artcoe Gilding Flake : Copper Thunder
ColorBox Fluid chalk and black archival ink
Small piece of acetate
Double sided adhesive

Happy Saturday X

Tuesday 9 October 2012

Star Twinchies

Twinchies are 2" by 2" little works of art, a bit like inchies but bigger. They are a good size for experimenting with those free stamps you get with magazines so I have made a set of three twinchies with a Christmas star theme.
I shall enter them in the "Show us Your Twinchies" Challenge #7 and see what happens.


For the backgrounds I used violet and blue pan pastels. The stamped images are free clear stamps from Craft Stamper magazine and Creativity magazine. The letters for the words are by Craftwork Cards and the O in JOY is a silver Candi, also Craftwork Cards. Tiny blue gems stuck in the centre of the hanging stars.
This is my first attempt at a set of twinchies for this blog challenge, it was fun, I'm not yet decided if I will use them on a Christmas card or just keep them as a set of twinchies.
Hope you like them.

Sunday 7 October 2012

Craft Barn Christmas Minifest

Saturday October 6th.
Up at the crack of dawn on Saturday as I had arranged to meet a friend and go to the Craft Barn for the Christmas Minifest. To clarify, "crack of dawn" for me is anything before 8.30am on a Saturday!
There were 6 demos to see, we spent 5 and a half hours at the place and I have parted with more of my hard earned cash.
The launch of the new PaperArtsy stamps by Jo Firth Young was great, the plates are wonderful. I bought one plate set and one mini, I was tempted to buy more!
Here is a picture of the display board :


and a shot of Jo showing us one of the cards :


I liked the look of the stamped images on Kraft cardstock so when I got back in the evening I tried it out. Easy, quick card to make and quite effective I thought. Here is mine:


The card is cut down to a square from a C6 card. The stamp is PaperArtsy JOFY JM03, stamped with black archival ink and coloured with mustard seed and salty ocean distress inks.

A really great day out, interesting demos, good company and to finish off my report on the day, here is a picture of the new stash that came home with me!


Saturday 29 September 2012

Shoes

The challenge theme this week at CASology is Week #12: SHOE!!


It was Wednesday night and I got in from work thinking what shall I do? I deliberated over the singular shoe and then started thinking about all the shoes that are in my wardrobe, under the bed, lined up on the bedroom floor, you get the picture. So, I need to use multiple shoes.
I had a little bag full of shoes punched out of different colour paper so I tipped them out, lined them up on my desk, moved them around, made patterns with them and ended up with a pinwheel of shoes. Lovely. It looked like a flower so thats what I did for this challenge, a flower made of shoes.
Having carefully arranged them in a circle on the desk, the difficult bit was keeping them in a circle to get them stuck onto some card. I got busy, so revisited the shoe circle again on Saturday morning. I turned them over because the backs of some were white and I thought if I arranged them face down then I could stick a circle on top of them, flip it over and the shoes would be in place. It worked, but do it quickly or the whole lot will end up stuck to the desk.
This is my shoe flower card, I enjoyed making this one!

Recipe:
Shoes punched out of scraps of coloured paper.
White die cut scalloped circle mounted on pink die cut scalloped circle.
Mount on black card and pink card, add a pink Candi (Craftwork Cards).
Sentiment from Craftwork Cards.

Sunday 23 September 2012

Roses, Stripes and Banners

This week's LIM recipe challenge is quite open to interpretation as the theme is to use 3 past challenges. Whilst blog hopping recently I came across a sketch challenge at Freshly Made Sketches which appealed to me so I will enter my card in two challenges for the very first time. A friend has a birthday soon so this one is for her.
The recipe I used for my Less is More challenge is:
Week 1 : Pink, Black and White
Week 54 : One layer - Stripes
Week 69 : Not a Square

The black and white paper used for the stripes comes from DCWV Black and White Paper Stack, the rose is made from Hunkydory paper and is mounted on a die cut scalloped circle. The banner is cut from Craftwork Cards paper.

Thanks for the sketch from Tui at Freshly Made Sketches.


Family Tree Tag

The fortnightly challenge at Artful Times is to use a tree as the main focus so it was an opportunity for me to do a project I have been meaning to do for some time. My idea was to make my tree focus into a family tree. I used Autumn colours as it is September and Autumn is coming soon.
For the background I used Cosmic Shimmer Mist in Mango Blaze and Golden Mint then random stamped the brick images to represent all the brick walls that have to be broken down when researching your family history. The tree is stamped on Tim Holtz Kraft Core card stock, torn, distressed and lightly sanded. I added punched flowers and a washer and finally the names of direct ancestors going back to great grandparents.
The stamps are from Katzelkraft : Autumn set.
I hope you like it.


Saturday 22 September 2012

White on White

I have tried a couple of attempts this week with the CASology Challenge cue card : White. At first I thought of a white wedding but wasn't particularly pleased with the result so changed direction and tried an all white card using texture to break up the whiteness, better result I think. Having made the cards, the most difficult part was capturing a photo that actually makes the project look white! I ended up putting it on the garden table as the light indoors was just not good enough.

This is the card I will enter in the challenge.
Ingredients:
White 5inch square card
Scallop edged embossed frame (Craftwork Cards)
White glitter mesh fabric behind the aperture
Two white die cut flowers, the top one rolled over a pencil to add curl and a white candi (Craftwork Cards) added to the centre.
White ribbon tied in a bow.


For completeness I will also post the first attempt which I call "White Wedding".

Ingredients:
White cardstock from Craftwork Cards
White paper lace heart (Dovecraft : Tea Party)
3 sequin embellishments from stash
Stamp from FRCL036 Wedding Bliss by Woodware
Hearts on stamped imaged coloured with clear Sakura glitter pen


Friday 21 September 2012

Less is More : Oval

I might just make the deadline with this entry in the Less is More challenge Week 85 theme to incorporate an oval into our projects. It wasn't as easy as I thought but a last minute idea resulted in this one layer card.


I used an oval aperture card as a template, spritzed with Cosmic Shimmer mister for the oval background and stamped the owl image in black archival ink. I added the sentiment - unsure of the English translation for "hou hou" but assume it relates to owls, Google translate did not help me out with this other than to suggest it is Dutch for "love love". The stamps are from an Autumn set by KatzelKraft, a French company, so unlikely to be Dutch. Perhaps someone can translate for me.

Saturday 8 September 2012

Less is More : Foliage

I enjoyed this challenge for week 84 at Less is More as it was an opportunity to use one of my favourite, and possibly oldest, rubber stamps from the Stampendous Petite Point Collection called Small Maple Points. The falling leaves were stamped directly onto white cardstock using ColorBox cats eye chalk in burnt sienna, blush rose, cadmium yellow and orange. The words are from Clarity Stamps and are stamped using black archival ink.
I was well out of my comfort zone with this challenge, I seldom use words and sentiments on my work but inspired by the examples by others I gave it a go and I do quite like it. I like the font on that stamp. Its quite tricky having the confidence to "go for it" as well, to commit to arranging the images on one layer. I probably need to improve on my photography as well but I reckon the mat for the background works with this one.


Inchies

Artful Times Challenge 12 is Inchies. I played around with inchies a couple of years back as I love miniature things. I remembered I had an old set of clear stamps that would be perfect for this challenge. I wanted to keep it simple as I think the images look best in black and white, this is the result, my inchies tag:


Ingredients:
Clear Stamps 98777 by Inkadinkado
Ranger Glossy Accents
Sizzix die cut swirl
Small luggage tag
Black ribbon from stash
Violet Shade 4703 Pan Pastel
Recipe:
Stamp images in black on white cardstock. Use glossy accents to make them look like tiles. Colour the tag background with violet pan pastel and add a die cut swirl cut from black textured paper. Add the stamped images and black ribbon to finish.

Thursday 6 September 2012

Travel Challenge

With the holiday season coming to a close, I'm still thinking I really should take a holiday sometime!
There is still time left for the Travel Challenge with Try it on Tuesday so I was thinking, what might represent travel other than a place to go. I have this sweet little rubber stamp of a camper van and it reminds me of the people I met in the early 1980's from Australia and New Zealand. Those vans seem to have come back into vogue now, we see a lot of them around nowadays.
So here is my attempt at a retro camper van.
Hope it makes you smile.

Recipe:
Background paper from Black and White Prints DCWV paper stack.
Fuschia pink card, sentiment topper and candi from the Tres Chic range, Craftwork Cards.
Camper van clear rubber stamp - free with Creative Stamping magazine, stamped with black archival ink and coloured with pink and orange Promarker pens.


Monday 3 September 2012

Tim Holtz Tag Challenge September 2012

Well, here's my version of the September Tim Holtz inspired tag.
I must say I love the industrial look and really enjoyed the background technique although I did not have the correct materials to reproduce it exactly as I would have liked. I don't  have any black alcohol ink but do have ginger so used that, it sort of works OK. I will invest in some black as I certainly will try this background technique again.
My tip for metal embellishments to add to your stash is to pop down to the local DIY store and buy some bags of washers, very inexpensive and you get lots for the money - see the zinc washer top right.
A great challenge this month, loved it!


Monday 27 August 2012

Blog Candy

Bank Holiday Monday today so I took a break from clearing out the wardrobe, tidying up and ironing to go to the Craft Barn for a bit of inspiration (and to part with some of my hard earned cash!). 

Check out The Craft Barn Blog as its Blog Candy time :


Saturday 25 August 2012

Green

The week 7 Challenge at CASolgy is to use the colour green. I love green, possibly my favourite colour - well, it is this week!
This card is not a new idea, I've used it many times and I think it lends itself quite well to a clean and simple design.
I think I need to pop by the DIY store again and replenish my stock of paint strips, I'm wondering what I might be able to do for Christmas using the same idea.
Enjoy.

Ingredients:

  • Tall slim pearlescent card
  • Dulux paint strip card picked up from DIY store
  • Inkylicious Wild Meadow rubber stamp, stamped in black archival ink
  • Mount on pastel green pearlescent paper 
  • Best Wishes peel off sticker to add the sentiment.


Tuesday 21 August 2012

Keep it Simple

Keeping it simple is often quite hard to do. I have often ruined a piece by adding too many embellishments or combining too many different techniques on one project.
The week 81 challenge at Less is More is tearing so I thought I might enter this small card example. The card was really quick to make, a torn piece of earth tone background paper mounted on a copper coloured die cut label that I found in my bit box. Add two gems to make the body of the bug and draw legs on him using a Sakura Micron 0.1 black archival ink pen.
I hope you like him.


Thursday 16 August 2012

Tim Holtz Tag Challenge June

I am now playing catch up so here is my version of the June Tim Holtz inspired tag. For this one I used a small luggage tag, spritzed the background with Shimmer Spritz and stamped random images in black. As the tag is so small the background is pretty much covered. I downloaded the vintage photo image and colour tinted it with Distress Markers. Added a few embellishments and this is the result. I think I prefer the larger tags to work on, more real estate.

Wednesday 15 August 2012

IndigoBlu FlitterGlu

I love the IndigoBlu range of rubber stamps so treated myself to a FlitterGlu starter kit and a set of the Pomp and Pagentry rubber stamps back in February when I visited the Creative Stitches and Hobbycraft show at Bluewater. The snow came down the night before so the show was pretty quiet, good for us but not so good for the exhibitors.
Here is a card that I made. 
I used evergreen bough and festive berries distress inks from the Tim Holtz winter set for the background and swirls. The Union Jack is stamped with FlitterGlu and Yorkshire Dales Mega Flakes applied, the gentleman was stamped with black archival ink.


Sunday 12 August 2012

Tim Holtz Tag Challenge August 2012

Finally, after deliberating for weeks, I am creating my first blog post.
Inspired by a friend's post yesterday, I decided to have a go at the Tim Holtz August tag challenge. Having none of the materials used in the example I had to improvise.
Background embossed and sanded ColorCore card stock using a Darice embossing folder. Spellbinders die cut shapes to make the frame and having no cameo rubber stamp, I remembered I had some cameo embossed card in my stash so coloured it with black soot distress ink. The flowers and leaf were added and the padlock die cut from gold card.
Hope you like it.