The theme for this week's Craft Barn challenge is stamping so I have combined stamping and doodling for my entry.
Stamps used : Leane Creatief Doodle Pine Cone and Woodware sentiment from Trio of Trees set.
Doodling by me.
Coloured with Promarkers : Shale, Cinnamon and Honeycomb
Clear Wink of Stella on the pine cone to add some shimmer (does not show up well in the photo as it is subtle).
I reckon this one is more autumnal than Christmas. Maybe I should add some snow?
Showing posts with label Promarker. Show all posts
Wednesday, 9 September 2015
Tuesday, 11 August 2015
Craft Barn Weekly Challenge 9 : Colouring
It has been an age since I entered any blog challenge so here goes, this is my entry for the Craft Barn Weekly Challenge 9 which is colouring using pens.
Stamp: Stampendous Cling Winter Birds.
I used Promarkers to colour the image:
Greens : Lime Green, Bright Green and Forest Green
Reds : Lipstick Red, Crimson and Burgundy
Browns: Satin, Sandstone, Cocoa and Walnut
Blue (for the dotty shadows) : Powder Blue
Some glitter is added to the bobbles on their hats and the snow on the branch and the card finished off with a bit of peeled paint distress ink around the edges.
Another Christmas card done to add to my 2015 stash, I am ahead of the game!
Saturday, 31 January 2015
Dotty Demos
My first visit to the Craft Barn for a demo day was last Saturday and the theme was dots. The demonstrators were using the new Woodware stamps and alcohol markers. Copics were used for the demonstrations but Promarkers work equally well.
Follow this link for Jane Gill's example from the demo.
Here are my attempts at using dots.
Follow this link for Jane Gill's example from the demo.
Here are my attempts at using dots.
Woodware : Love Tulips
Promarkers : Forest Green, Lime Green, Pastel Blue and blender pen.
Woodware Clear Stamp : Bubble Blooms
Promarkers : Burgundy, Walnut, Coral, Marine, Oasis
Black dots added with a Sakura Micron pen
Many Thanks to Jane Collman and Jane Gill at the Craft Barn for the inspiration.
Monday, 1 December 2014
Oyster Stamps Craft Retreat Weekend
I have returned from a weekend away at the Oyster Stamps Craft Retreat. Two days of workshops at The Hellidon Lakes Hotel in Daventry with excellent projects demos and advice from Martine, Hellen and Eileen. I have completed most of my projects, feeling pleased with myself for having done that!
The workshop with Hellen Pearce taught us colouring techniques and stamping. Details of the products used and Hellen's examples can be found on her blog : elliescupboard.blogspot.co.uk
Key point from this workshop that I have taken away with me, other than the Promarker colouring technique, is to not always use the whole stamp on a project. Partial images look good in these panel layouts. I chose the traditional red and green colours for my project but of course you could use anything.
I really should put a present in that bag and give it to somebody but .... I think I will keep it :)
This is the project from Eileen's second workshop. Stencils and stamped images are Designs by Ryn again. Aren't those bubbles delicious.
Ryn stamps are available from the Oyster Stamps shop : http://www.oysterstamps.co.uk/
Martine's workshops included lots of die cutting and beautiful flowers. The first project was a box with a matching card. I didn't complete this one but here is a picture of the card. That poinsettia is die cut using a Frantic Stamper die. For more of Martine's lovely white on white artwork and flowers go visit her blog : http://abfabdesigns.blogspot.co.uk/
The workshop with Hellen Pearce taught us colouring techniques and stamping. Details of the products used and Hellen's examples can be found on her blog : elliescupboard.blogspot.co.uk
Key point from this workshop that I have taken away with me, other than the Promarker colouring technique, is to not always use the whole stamp on a project. Partial images look good in these panel layouts. I chose the traditional red and green colours for my project but of course you could use anything.
I really should put a present in that bag and give it to somebody but .... I think I will keep it :)
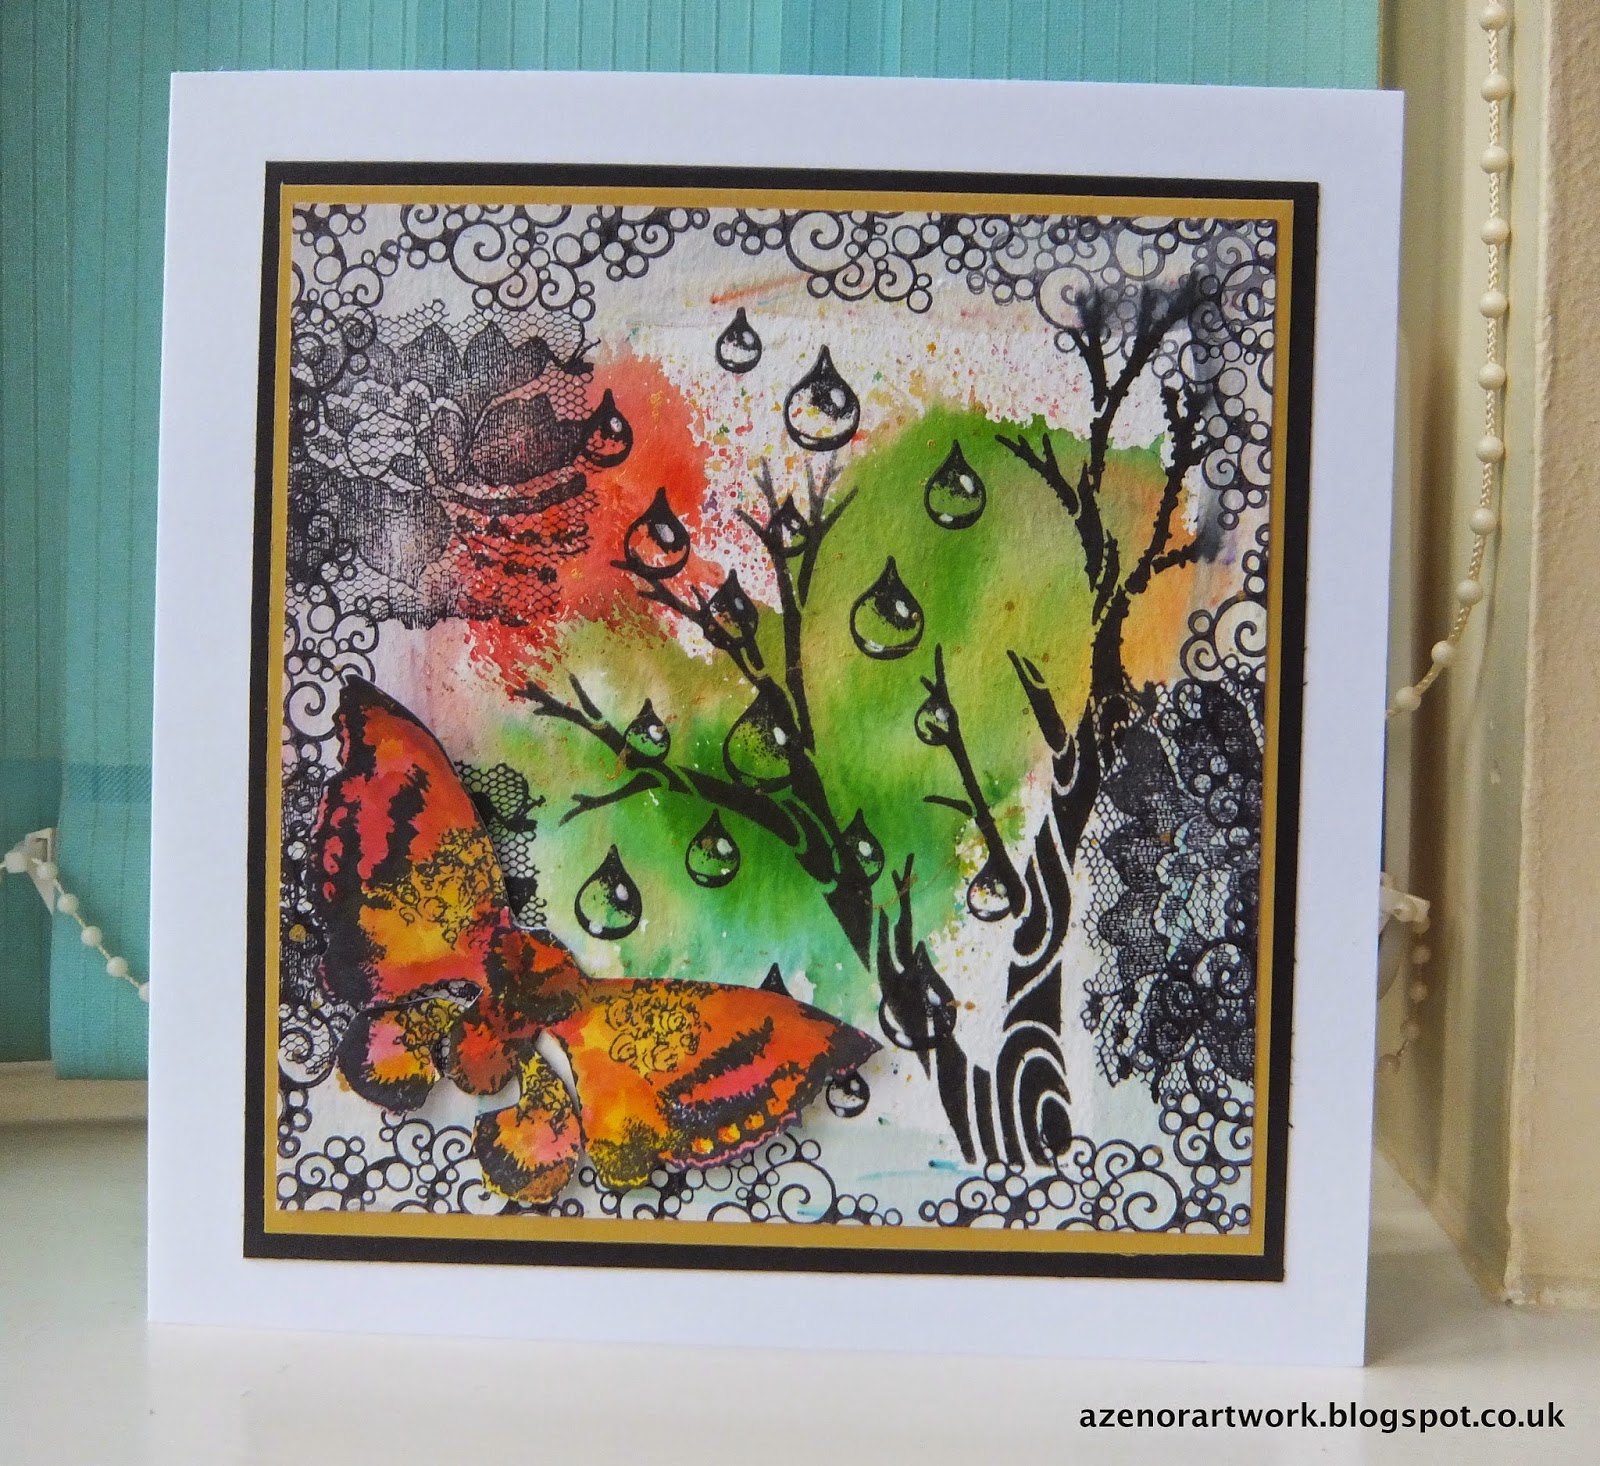
The workshops with Eileen Godwin were fabulous, I got to play with those lovely Designs by Ryn stamps and the new Brusho paints (yes, of course I bought some). Totally in my comfort zone with this as we played with the paint and distress ink. Lots of layering in the first example below. The tree branches are a stencil from Ryn as well as the stamped images including the famous water droplets.
Eileen work can be found on her blog : http://eileenscraftyzone.blogspot.co.uk/
There will be You Tube videos for Brusho techniques posted early December so look out for those.
This is the project from Eileen's second workshop. Stencils and stamped images are Designs by Ryn again. Aren't those bubbles delicious.
Ryn stamps are available from the Oyster Stamps shop : http://www.oysterstamps.co.uk/
Martine's workshops included lots of die cutting and beautiful flowers. The first project was a box with a matching card. I didn't complete this one but here is a picture of the card. That poinsettia is die cut using a Frantic Stamper die. For more of Martine's lovely white on white artwork and flowers go visit her blog : http://abfabdesigns.blogspot.co.uk/
Martine's second workshop had us making a flower from black (or red) card stock and altered with pan pastels and treasure gold. I love the metallic effect of the gold on black.
.... and a close up of the flower.
A big Thank You to the Oyster Team for a superb craft retreat.
I have met new friends and learned new things. All in all, a very excellent weekend.
Sunday, 31 August 2014
I do like to be beside the seaside.
A quick post from me today, my entry in this week's Less is More challenge for week 187 where there is a song theme : "I do like to be beside the seaside".
Clear stamp from Acid Drops and Whatnots.
Image coloured with Promarker pen : poppy.
Panel matted on centura pearl black card and all mounted on a white deckle edge card.
Sunday, 7 July 2013
Shades of Grey
Less is More have a colour challenge this week, Shades of Grey. They would like to see a minimum of two shades of grey and I think I have managed seven on this card, would have been eight if I had some grey pearls but I didn't so I used white. I put the project on some grey card to take the photo so that is arguably eight different greys. Oh, I popped some red on it too because, after all, it is a poppy.
What I used:
White A6 card : Craftwork Cards
Dark grey textured cardstock : DCWV
Grey floral paper : Craftwork Cards
Silver embossing powder : Ranger
Promarkers : Cool grey 1, 2 and 3
Dewdrop ink : London Fog
Hobby Art CSS001 Bordered Poppies clear stamp
Spellbinders Nestabilities A2 Distressed Edges die
X-Cut corner punch
Tiny pearls from stash
Red Sakura stardust pen
When you list them out, that is a lot of things to make one card!
What I used:
White A6 card : Craftwork Cards
Dark grey textured cardstock : DCWV
Grey floral paper : Craftwork Cards
Silver embossing powder : Ranger
Promarkers : Cool grey 1, 2 and 3
Dewdrop ink : London Fog
Hobby Art CSS001 Bordered Poppies clear stamp
Spellbinders Nestabilities A2 Distressed Edges die
X-Cut corner punch
Tiny pearls from stash
Red Sakura stardust pen
When you list them out, that is a lot of things to make one card!
Saturday, 6 July 2013
In an English Country Garden
Well Summer came and I took off to have a look around Nyman's Garden this morning hoping for some inspiration for the Twinchie Challenge #6 : In an English Country Garden. There was plenty of inspiration, so much in fact that I stuck with my original idea but added a second one inspired by this pot .... so English.
These are my twinchies. The top one inspired by the pot has a chalk background in green and blue, the hanging leaves are stamped using peeled paint distress marker, the pot stamped and masked out then the trowel and flowers added. The images are from a Lindsay Mason Design stamp set called Watering Can Scene. The pot is coloured with promarker, the flowers stamped with blue archival ink and liquid pearls added to the centres of the flowers.
The twinchie below uses an image from a Craft Stamper magazine freebie, a really old one but I was really good last weekend and organised all my old free magazine stamps into one box so I can see what I've got. I quite like these blackberries so thought they would make a good focal point for the twinchie. The background is antique linen and mulled lavender distress ink, very pale but gives it that aged look with a hint of colour. I stamped the blackberries twice, coloured them with promarkers and cut them out and stuck them on with pinflair glue. The butterflies and strawberries are elements from a Lili of the Valley stamp, they are tiny, I thought I'd leave them uncoloured to look a bit sketchy. I prefer the second one.
I hope you are enjoying the weather. Don't stay out in that sun too long!
Tuesday, 28 May 2013
Demos and Inspiration
I so enjoy going along to these demo days that our local craft shops run. It is such a good day out and you come away brain loaded with inspiration and maybe a few new things to add to the stash.
On Sunday I went to The Glitter Pot near Burgess Hill with a friend, we didn't know about the demo days at the weekend until I happened to notice a blog posting from Imagination Crafts mentioning that they would be there. So, a quick bit of organisation, like who picks up who and who is driving and off we went. The Imagination Crafts stencils are so nice and they have brought out some thicker ones that you can use for embossing with a 6x6 embossing mat, interesting.
Fab demo from Kay for IndigoBlu and I resisted buying the Kroma Crackle which was stupid because I think I want some of that, yes, I do want some of that! Kay was amazing, she showed us a demo of the flitter glue and mega flakes then did a one on one for my friend to try it, how kind.
One of the demonstrators was from Hobby Art and she showed us a quick card using some of the elements from the Butterfly Kisses set "Old Crock", a lovely image of an old car. So, I bought the set and Monday morning I had a go. This is the card I made:
On Sunday I went to The Glitter Pot near Burgess Hill with a friend, we didn't know about the demo days at the weekend until I happened to notice a blog posting from Imagination Crafts mentioning that they would be there. So, a quick bit of organisation, like who picks up who and who is driving and off we went. The Imagination Crafts stencils are so nice and they have brought out some thicker ones that you can use for embossing with a 6x6 embossing mat, interesting.
Fab demo from Kay for IndigoBlu and I resisted buying the Kroma Crackle which was stupid because I think I want some of that, yes, I do want some of that! Kay was amazing, she showed us a demo of the flitter glue and mega flakes then did a one on one for my friend to try it, how kind.
One of the demonstrators was from Hobby Art and she showed us a quick card using some of the elements from the Butterfly Kisses set "Old Crock", a lovely image of an old car. So, I bought the set and Monday morning I had a go. This is the card I made:
Materials and recipe:
Butterfly Kisses stamp set - Old Crock BK-HA008
Background coloured with distress ink, shabby shutters, tumbled glass and edged with vintage photo.
The branches and foliage are first and second generation stamping, I used an old green marker pen.
The car image was coloured with Promarkers.
Mounted on pale turquoise card from Craftwork Cards.
Just as well we had a Bank Holiday on Monday so I had a chance to play.
Sunday, 19 May 2013
Poppy Scene
Wow! It did not rain today after all so I went out for a wander around Borde Hill Gardens, a gem of a place in West Sussex with a particularly nice little art gallery and a great tea room. I just had to share this photo of a poppy I saw today, the blue was stunning.
So on to the artwork. Yesterday I was playing with my Hobby Art Poppy Scene-it set (CS044D). The design for this card isn't entirely my own work as its loosely based on something I saw at The Craft Barn last time I visited. The example I saw had a scene framed with poppies around it so I wanted to have a go at something similar. My scene and poppies are coloured with promarkers and the poppies and leaves cut out and added to the frame. All mounted on red cardstock embossed with a Cuttlebug flower embossing folder.
Having seen the blue poppies today, I think I need to try something in blue.
Hope you are all having a great weekend and a big thank you to all those who comment on my posts, means a lot to me.
Monday, 13 May 2013
Floral Tiles
Maybe its because it is Springtime but I'm in a floral mood at the moment. I was experimenting with Cosmic Shimmer Ultra Thick Embossing Crystals, I love the effect you get layering them up, very satisfying to see them melt.
Stamp : Penny Black Slapstick Cling - Mosaic
Coloured with Promarkers, cut into four and embossed with the UTE crystals (3 layers), mounted on black card and then arranged on gold sparkle paper.
The birthday circle is a die cut sentiment from Craftwork Cards.
I'm wondering what else I can do with this stamp, perhaps something monotone with one of the flowers highlighted in colour or maybe stamp it with various distress inks and use it as a background for something vintage. When I first got this one in a sale I wasn't sure what to do with it but as always when you use something for the first time other ideas come to mind.
Thursday, 11 April 2013
Spring
I should really be going to bed but I am wide awake so I have decided to post my entry for this month's Show us your Twinchies challenge 4 entitled Spring.
For the background I used a black fine micron pen to draw the faux stitching grid and coloured the grid lines with a promarker. It sort of reminds me of floral duvet covers. The tiny flowers are from an element on a WOW set, stamped using worn lipstick distress marker. The bird is from a Polka Doodles set that was free with a magazine, I've used this little bird lots of times, isn't he sweet. He is stamped onto white cardstock and the body cut out, coloured with Promarkers and raised on foam pads.
Lets hope the weather warms up a bit at the weekend and we can all get out and about and enjoy the Spring.
Sunday, 31 March 2013
Happy Easter
Good Morning and a happy Easter to all.
Today it is officially British summertime and since the clocks have gone forward I guess I should have said Good Afternoon.
I am off to visit friends this afternoon so I made a card to take with me. The Less is More Challenge this week is to use scallops so I will enter my card for the challenge.
Today it is officially British summertime and since the clocks have gone forward I guess I should have said Good Afternoon.
I am off to visit friends this afternoon so I made a card to take with me. The Less is More Challenge this week is to use scallops so I will enter my card for the challenge.
Stamps used : Jofy09 and Jofy11
Flowers coloured with Promarkers
Scallop border punch - Martha Stewart
Background polka dot paper from stash and mounted on Kraft card
Have a very Happy Easter and hope your day is lovely too wherever you are,
Julia x
Saturday, 10 November 2012
Poppy Day
Remembrance Day 11th November 2012
"They shall grow not old, as we that are left grow old:
Age shall not weary them, nor the years condemn.
At the going down of the sun and in the morning
We will remember them."
I made my twinchie for remembrance day and will enter it in the Show us Your Twinchies Challenge #9 'Hot Colours'.
I used red pan pastel for the background and stamped poppy buds in versmark around the edges, more pan pastel on top to highlight the buds. The main poppy image is a stamped and embossed in balck using an old freebie stamp from a magazine, coloured with promarker and mounted on the background. I used black soot distress ink around the edges.
Here is my remembrance poppy:
"They shall grow not old, as we that are left grow old:
Age shall not weary them, nor the years condemn.
At the going down of the sun and in the morning
We will remember them."
I made my twinchie for remembrance day and will enter it in the Show us Your Twinchies Challenge #9 'Hot Colours'.
I used red pan pastel for the background and stamped poppy buds in versmark around the edges, more pan pastel on top to highlight the buds. The main poppy image is a stamped and embossed in balck using an old freebie stamp from a magazine, coloured with promarker and mounted on the background. I used black soot distress ink around the edges.
Here is my remembrance poppy:
Subscribe to:
Posts (Atom)